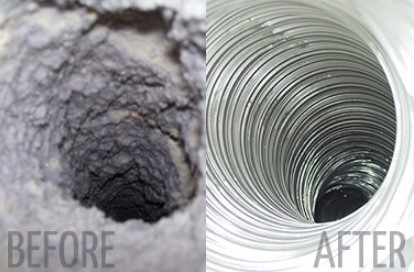
The process of a dryer vent cleaning isn’t something that many homeowners want to go through because of its rigorous steps involved. However, this is something you should do, whether you love doing it or not. Remember that dirty dryer vents are not only filthy, but they can be a serious fire hazard. According to research, dirty dryer vents are the leading causes of fires in Toronto homes.

Besides, a dryer with ducts full of debris and dirt cannot function as fast and effective as it should be. If your dryer took only thirty minutes to clean a load, and nowadays it takes up to an hour, the culprit could be the venting system. Dust might have accumulated inside the dryer vent and leaving smaller space for heat to be expelled out. If that is the case, there is no doubt that you would need dryer vent cleaning as soon as possible before serious problems arise.
Locate Your Vent
To do proper vent cleaning, you should first locate where the vent starts and where it ends. In most dryer vents, there is a short 4-ich diameter exhaust at the back. It is this exhaust that is connected to ductwork in the wall via an aluminium elbow or a different pipe. Hot hair is transferred through the metal pipe and get outside via an opening to the wall of the structure.
The dryer vent exhaust in most cases is connected to the duct at the foundation of the wall in the laundry room. At the point where the hot air escapes are louvred with a plastic cover. This prevents vermin from getting into the room via the vent while allowing warm air to escape.
Safely Disconnect the Dryer
After locating the start and the endpoint of your dryer vent, now the next thing you should do is to disconnect the dryer. If you have an electric dryer, it takes a few minutes, and it is something simple to do. Start by unplugging the power cord of your machine from the wall outlet. Get rid of any clamps or metal tapes holding the dryer vent in position to the exhaust.
Then pull the vent pipe to remove it from the wall duct. If you have an electric dryer, this is easy to do without any problem. This gives you more space to work. If you have a dryer that uses natural gas, you should take extra precautionary measures. Remember that gas leaks can be deadly, so in case you find something you are not sure about, consult a professional.
Clean, Clean, Clean.
Now, you have done most of the preparations to start dryer vent cleaning. You can reach the dryer vent opening as the laundry wall. You can also access the exit point at the exterior by removing the duct cover. At this point, you need to have a vent cleaning kit. This kit should come with a lint brush and 3-foot long flexible parts. These parts are joined together to create a rod of 12 feet.
Connect your rod to the lint brush and insert it in the vent and spin the brush. You will be able to remove any lint and dust. Spin it speedily to break any debris accumulated in the vent.
Tidy Up and Reconnect All the Parts.
If it has been a while since you cleaned your dryer vent, after the vent cleaning Toronto, you will expect to get a lot of lint spread on the floor. You need to clean all that mess and vacuum the place. Sometimes, you will need to vacuum the place more than once to make it look as it was before. For this work, a simple broom and a dustpan will be good.
After cleaning everything, reconnected everything except for one- if you had used a soft foil style vent to connect to the wall duct, eliminate it since it can be a fire hazard. Rather than using it, replace it with aluminium elbows. Apart from being adjustable, they are long-lasting and offer the best airflow.
Perform A Trial Run.
Having a thorough dryer vent cleaning Toronto is challenging and messy work, but at last, you enjoy your hard work. After reconnecting everything, make a quick trail to see whether your appliance is working as you expect. You will notice they have rejuvenated their power.


![Best Crochet Hooks for Beginners and Pros [2020 Update] best crochet books](https://www.awebtoknow.com/wp-content/uploads/2018/01/best-crochet-books-100x70.jpg)